The ideal and easy dev setup guideline for a Python-based data science project.
This blog serves as a note for myself when I want to build a Python based data science project. This is a minimal setup and mostly for ad-hoc or light-weight DS experiment projects. We can even drop the pytest part if not needed, or add more parts such as continuous integration and deployment if the project becomes heavier and more mature.
Basic environment requirements
First, let’s lay out the basic environment that we have for the OS system. I’m using macOS Catalina 10.15.3 at the time of writing. Also, I don’t use conda now, but I have to admit that I used conda heavily, and then realized that it is not flexible enough for me to quickly setup or remove light weight project environment.
- To uninstall conda, we can do this:
1
2
conda install anaconda-clean
anaconda-clean --yes
Don’t forget to remove the conda initializing bash script and remove it from your PATH in your ~/.bash_profile or ~/.zshrc if you are using zsh
Make sure your
xcodeis updated.1
xcode-select --install
Make sure your
homebrewis updated1
brew upgrade
If you still want to keep conda, here is the recipe, thanks to this stackoverflow thread:
Expose command conda but don’t activate any environment, even the base environment. Execute the following commands in your shell.1
2
3
4
5
6
7# Run the content in the shell
# init conda, the following command write scripts into your shell init file automatically
conda init
# disable init of env "base"
conda config --set auto_activate_base false
Note: After this setup, the default python is the one set by pyenv global. Use pyenv and conda to manage environments separately.1
2
3
4
5# virtual environments from conda
conda env create new-env python=3.6
conda env list
conda activate new-env
conda deactivate
Use pyenv to manage python versions
Pyenv is a python installation manage.
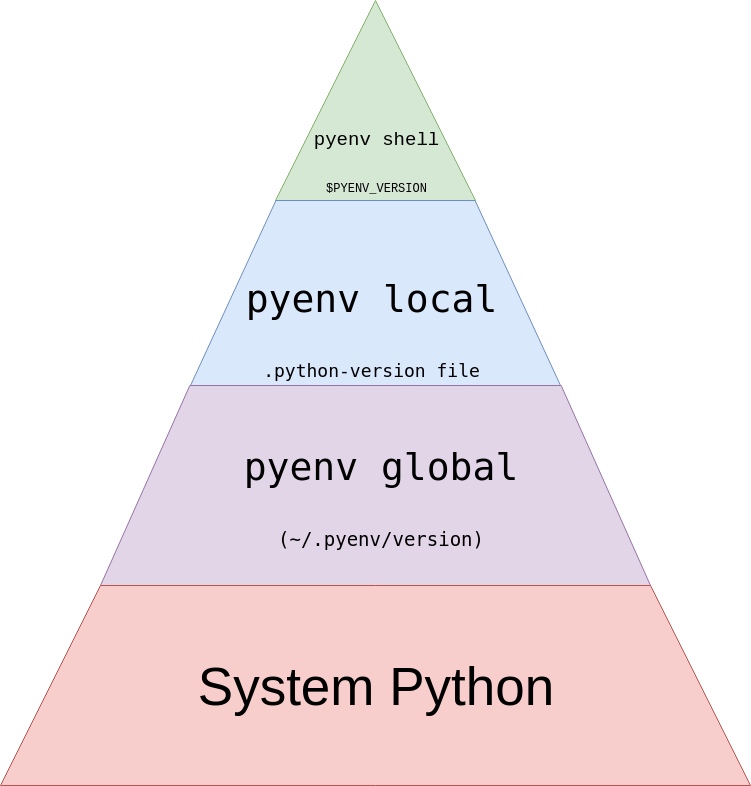
Illustrates the hierarchy that pyenv uses to decide which installed python version to use. From realpython.com
Install pyenv
1 | # Install pyenv. |
Now let’s install some commonly used python versions:1
2
3
4
5
6
7
8
9
10
11
12
13
14
15
16
17
18
19# See all available python installations.
pyenv install --list
# Install some python versions.
pyenv install 3.7.5
pyenv install 2.7.17
pyenv install 3.8.0
# See all python installations that you have installed.
pyenv versions
# Set the default/global from one of the python versions.
pyenv global 3.8.0
# In the current directory, set the python version. This creates the file .python-version.
pyenv local 2.7.17
# To see which python is currently being used.
pyenv version
Use poetry for packge/environment management
The biggest advantage of it from my point is that unlike conda, it manages virtual environments as well as project dependencies. And we can choose to put the virtual env folder inside the project itself.
Install poetry
1 | $ curl -sSL https://raw.githubusercontent.com/sdispater/poetry/master/get-poetry.py | python |
If you want to install the beat version, e.g. 1.0.0b9 which provides more functionalities:1
2export POETRY_VERSION=1.0.0b9
POETRY_PREVIEW=1 curl -sSL https://raw.githubusercontent.com/sdispater/poetry/develop/get-poetry.py | python
Make sure $HOME/.poetry/env is added to your $PATH variable. If you are using bash, you can achieve this by adding the following to ~/.bash_profile, and then restart your terminal.1
2
3# poetry
source $HOME/.poetry/env
export PATH="$HOME/.poetry/bin:$PATH"
When in question, always refer to poetry’s official tutorial
Build our project
Initial setup
If you want to use poetry in an existing project, run poetry init in your project directory to create a project.toml file
If you want to create a new project and manage it using poetry, run poetry new <name>, and it will create a project with the following structure. Then cd to the project directory.1
2
3
4
5
6
7
8<name>
├── pyproject.toml
├── README.rst
├── <name>
│ └── __init__.py
└── tests
├── __init__.py
└── test_<name>.py
Since I prefer to put the virtual environment folder inside the project, so let’s change the configuration1
2poetry config settings.virtualenvs.in-project true
# poetry config --local virtualenvs.in-project true <--- run this if you only want this config to be local
Then run poetry install: it will use poetry.lock if it exists or if will solve dependencies with pyproject.toml and do installation accordingly. And poetry will check if it’s currently inside a virtualenv and, if not, will use an existing one or create a brand new one for you to always work isolated from your global Python installation.
Add some essential packages for DS development
1 | poetry add pandas numpy scipy matplotlib scikit-learn # dataframe operation |
To install a specific version:
poetry add sdk="1.4.4". version constraint syntax:^1.4means>=1.4.0 <2.0.0. To downgrade the dependency to a certain version, it is the same; no need to poetry remove sdk first.
Use jupyter with poetry
This part is a bit tricky, at least for me at the first time. So basically, Jupyter works with kernels, and will not work out of the box with your virtual environment that poetry created for you. If you wish to work in a jupyter notebook based on your virtual environment, you need to create a kernel for that virtual environment. The code below explains how. The prerequisite is that you have added both jupyter and ipykernel as dependencies in your poetry project.
Then make sure you run the below command within your virtual environment1
2
3
4
5
6poetry add jupyter ipykernel jupyter_nbextensions_configurator jupyter_contrib_nbextensions # jupyter related
poetry run jupyter contrib nbextension install --user
poetry run jupyter nbextensions_configurator enable --user
# Best practice is to use the same name for your kernel as the project.
poetry run ipython kernel install --user --name=<your project name>
Run your python script
Say we have a demo script – src/example.py which uses the dependencies we have installed using poetry add. Then to run this script:1
2
3
4
5
6
7
8
9
10
11# Try running the script outside your virtual environment. This won't work.
python src/example.py
# Run the script within your virtual environment, using the 'run'-command.
poetry run python src/example.py
# Spawn a shell within your virtual environment.
poetry shell
# Try running the script again, after having spawned the shell within your virtual environment.
python src/example.py
Add black config
If you want to add custom black formatter rules, add those to pyproject.toml. An example is like this:1
2
3
4
5
6
7
8
9
10
11
12
13
14
15
16
17
18
19
20
21
22
23[tool.black]
line-length = 120
target-version = ['py37']
include = '\.pyi?$'
exclude = '''
(
/(
\.eggs # exclude a few common directories in the
| \.git # root of the project
| \.hg
| \.mypy_cache
| \.tox
| \.venv
| _build
| buck-out
| build
| dist
)/
| foo.py # also separately exclude a file named foo.py in
# the root of the project
)
'''
Install pre-commit
The pre-commit framework is a took which implements pre-commit hooks to your project. Defined hooks are run every time you run git commit -m and will prevent the commit if the hooks fail. Install it with brew install pre-commit.
To install black as a pre-commit hook, add the following in a .pre-commit-config.yaml file to the top of your project:
1 | repos: |
To install the hook, go to the top of your project and run pre-commit install
Summary
When we have all the above-mentioned tools installed, the following is the general steps we will need at the next time we initialize a DS Python project:1
2
3
4
5
6
7
8
9
10
11
12
13
14poetry new demo
cd demo
poetry config settings.virtualenvs.in-project true
pyenv local <python-version>
poetry add pandas numpy scipy matplotlib scikit-learn # dataframe operation
poetry add --dev black flake8 # formatter
poetry add -D pytest # test
# ===== add jupyter kernels if needed ===== #
poetry add jupyter ipykernel jupyter_nbextensions_configurator jupyter_contrib_nbextensions
poetry run jupyter contrib nbextension install --user
poetry run jupyter nbextensions_configurator enable --user
poetry run ipython kernel install --user --name=<your project name>
Add black configuration to pyproject.toml1
2
3
4
5
6
7
8
9
10
11
12
13
14
15
16
17
18
19
20
21
22
23[tool.black]
line-length = 120
target-version = ['py37']
include = '\.pyi?$'
exclude = '''
(
/(
\.eggs # exclude a few common directories in the
| \.git # root of the project
| \.hg
| \.mypy_cache
| \.tox
| \.venv
| _build
| buck-out
| build
| dist
)/
| foo.py # also separately exclude a file named foo.py in
# the root of the project
)
'''
Add .pre-commit-config.yaml file, and run pre-commit install afterwards1
2
3
4
5
6repos:
- repo: https://github.com/python/black
rev: stable
hooks:
- id: black
language_version: python3.7
After writing your code, and before commit your code, run1
black . # format your code
After writing your tests, run1
2pytest
# pytest -q test/test1.py
Reference
https://zhuanlan.zhihu.com/p/81025311
https://flynn.gg/blog/software-best-practices-python-2019/
https://blog.jayway.com/2019/12/28/pyenv-poetry-saviours-in-the-python-chaos/