关于Hexo Icarus主题配置的详细介绍,和相关的一些小技巧。
========= 我是分割线 =========
这篇文章在2018年写的,最近添加了live2d的更新。前面的部分可能有out-dated的情况请见谅。
========= 我是分割线 =========
前言
此篇不介绍HEXO的搭建,只讲ICARUS的个性化配置,HEXO的配置在国内也有很多的教程。
教程参考了这里:作者MoRan_Sky, 这里:作者Lemon和这里:作者Fengyu。
发布者已经把基本的配置步骤写在了wiki里,还包括FQA,如果有什么解决不了的问题也可以到Icarus GitHub Wiki去提问,或看有没有和你同样问题的回答。
ICARUS主题
什么是ICARUS
- 一种很清爽的HEXO主题
- 安装了评论,分享框架,非常之方便
ICARUS安装
ICARUS主题包可以在这里找到,但更多人是采用GIT来下载的,切换到HEXO根目录,然后打入:
1 | git clone https://github.com/ppoffice/hexo-theme-icarus.git themes/icarus |
下载之后将根目录里的
1 | theme: 你之前的主题 |
改成:
1 | theme: icarus |
接下来可以输入hexo s来在本机生成,然后在 https://localhost:4000 打开博客主页。
主题设置
自带可更改项目
LOGO配置
在博客页面的左上角,有一个LOGO,因为我们没有更改,所有这是作者的LOGO。
先确定你的LOGO图片的后缀是.png,然后把你的LOGO图片重命名为logo.png,然后在你主题文件中的css/images/文件夹,将这张图片粘贴来替换之前的图片。
用户信息配置
在主页的左边,这里显示的是博客作者的信息。
打开主题的_config文件,找到profile一栏,你可以自定义你的profile信息。
1 | profile: |
如果想把FOLLOW按钮稍作修改,变成联系我,并且把链接变成发送邮件到自己的邮箱的话:
1 | follow: mailto:wulala@123.com #效果是直接到发送邮件的界面,把languages/zh_CN.yml中的follow信息改成了联系我 |
标签,分类和关于
在最上方的菜单栏,我们点击”标签”,”分类”,”关于”都会显示无法找到文件,ICARUS主题很好,它为我们预设了这三个分类。
在主题的_source文件里,把里头的三个文件全部复制,然后粘贴到HEXO跟目录的source文件夹,再刷新一下网页,就可以看见啦。
代码高亮
ICARUS主题预设了许多代码高亮的主题,具体的名称可以在主题目录的source/css/_highlight文件夹里找到。
把主题的_config文件里的highlight类型换成你喜欢的类型。
关于选择代码高亮语言的问题,请看这里。
搜索
ICARUS主题提供了3种搜索方式,个人喜欢insight,当然你也可以选择baidu或者swiftype。
使用insight的话先把博客根目录下面的_config.yml里面的
1 | search: |
改成
1 | search: |
接下来需要安装一个小插件:
1 | npm install hexo-generator-json-content --save |
接下来可以刷新一下网页,点击右上角的搜索框,就会发现已经成功配置了。
删除搜索按钮
如果使用的是insight搜索,所以那个搜索按钮没有什么意义,可以找到主题文件中的layout/search/index.ejs,将里面的:
1 | <form class="search-form"> |
改成:
1 | <form class="search-form"> |
之后你就会发现那个搜索按钮没了。
多说评论
评论是个很重要的东西,这可以让你和读者进行沟通。
如果需要开启评论功能,需要先去相应的地方注册账号,然后按照提示把ID或名字添加上。点击这里 跟着做就对了。剩下一些评论框自定义的样式就自行百度,或注册后在网站内进行更改设置就好了。
多说:在多说官网先创建一个账号,然后再这里创建一个站点,站点地址写博客的地址,在多说域名那里按照要求填入,填入的名称(也就是去掉.duoshuo.com)就是多说的shortname。
ICARUS已经为你写好了评论的框架,你不需要自己搭建,你只需要把主题的_config文件中的comment改成这样:
1 | comment: |
之后刷新页面,拉到下面,就会看到评论的界面啦。你可以前往你自己的多说域名然后自定义评论。
对于想使用Disqus的用户,去Disqus官网新建个账户。Create a new forum, 然后按照官方指南把自己的forum integrate到博客来。现在对于Hexo平台还没有integrate好的选项,没关系,等到你选择自己的forum名字的时候记住那个shortname,到icarus主题里的_config文件里填上就好了。主题会帮你做好所有的integrate。
分享
在本地使用bdshare,jiathis都是可以的,但在Github上神奇的消失了。我也试过bshare,dsshare,但还是神奇的消失了,读者可以自己的试一下。如果你也用Github Page,建议把主题的_config文件中的share改成:1
share: addtoany
友情链接
ICARUS自带友情链接功能,在主题的_config中的miscellaneous里:1
2links:
显示名: 链接
比如:1
2
3links:
GitHub: http://github.com
MCBBS: http://mcbbs.net
个性化修改
删除搜索按钮
如果使用的是insight搜索,所以那个搜索按钮没有什么意义,可以找到主题文件中的layout/search/index.ejs,将里面的:
1 | <form class="search-form"> |
改成:
1 | <form class="search-form"> |
之后你就会发现那个搜索按钮没了。
把文章界面放宽
在ICARUS主题里,如果你把屏幕放的宽一点,真正的文章就只有中间一小条,我们需要稍微把文章DIV放宽一点。
把主题的source/css/_variables.styl文件打开,翻到43行左右,把:
1 | main-column = 7 |
改成
1 | main-column = 10 //或者也可以改成9,着看个人喜好,我觉得10正好合适 |
设置友情链接为打开新页面
之前的友情链接会在自身的博客覆盖,如果想要在新窗口打开(比较推荐这样)。
把主题文件的layout/widget/links.ejs打开,把:
1 | <li> |
改成
1 | <li> |
社会链接
在关注我按钮的下面的下面,有一排图标,这就是社会链接,也就是你在别的地方的首页。它是fa fa-icon,ICARUS自带FontAwesome,所有你再安装的时候只要写入class名就可以。详细的图标内容可以在这里找到。
格式:fa-后面的内容,图标: 链接
打开主题的_config文件:
1 | social_links: |
在这里,我们只需要输入fa-后面的内容当图标就行了。
自定义社会链接title
在社会链接的图标上停留的时候,会弹出图标名的title,但有时候我们想自定义title,怎么办呢?
打开主题文件中的layout/common/profile.ejs文件,把:
1 | <a href="<%- url_for(theme.customize.social_links[i]) %>" target="_blank" title="<%= i %>" <%= tooltipClass %>> |
改成:
1 | <a href="<%- url_for(theme.customize.social_links[i].link) %>" target="_blank" title="<%= theme.customize.social_links[i].title %>" <%= tooltipClass %>> |
那么我们在config里的social_links的表达内容就是:
1 | 图标名: |
横幅和略缩图
在HEXO的根目录source/_posts文件夹,里面有你的文章,ICARUS允许你为文字设置横幅与略缩图,切记都要在两个—之间输入。
略缩图的设置方式:thumbnail:图片
横幅的设置方式:banner:图片
修改代码的的边距
修改之前的代码块长这样:

这个代码块的边距个人觉得有点大了。尤其对于只有一两行的代码,很占空间。
从哪里能改呢?先从主体的CSS文件看起:~/hexo_blog/themes/icarus/source/css/style.styl
里面与code有关的有两个地方,改了在第30行附近的设置,发现并没有什么变化。再往下看,发现这个另外一个文件被调用了 @import "_highlight/index",于是我们去~/hexo_blog/themes/icarus/source/css/——highlight/index.styl看看:
1 | .highlight |
我把padding相关的参数改成10px
给图片加阴影
有时候添加的图片可能会与文章背景混淆,使得读者看不清到底哪部分是图片哪部分是文章。使用img-shadow为图片添加边角阴影可以更加凸显图片的位置,也能更美观。
在article.styl里面加入以下:
1 | .img-shadow |
关于CSS3 shadow属性的参数具体可以参考W3School的Tutorial
使用HTML语法插入图片:
1 | <img src="http://test.jpg" class="img-shadow" /> |
修改引用的渲染格式
改动之前的是这样的:
个人不是很喜欢这种模式。不简洁,也占空间。
同样从从主体的CSS文件看起:~/hexo_blog/themes/icarus/source/css/style.styl,发现调用了@import "_partial/article"。打开它发现对blockquote的设置如下:
1 | blockquote |
我把它改为下面这样
1 | blockquote |
testing blockquote
在Post页面关闭侧边栏
点进去文章的时候觉得侧边栏(分类,标签…)让人觉得有点多余,不能专心看文。就想找方法把它设置为只在首页显示而不在文章页面显示。
打开~/hexo_blog/themes/icarus/layout/layout.ejs会找到下面一行代码
1 | <% if (theme.custom.sidebar) { %> |
theme.custom.sidebar 指的是主题_config.yml里面的参数。我们可以对应的找到custom下面的sidebar。发现它只有left, right两个设置。
没关系,那我们就自己加个参数在_config.yml里面吧:
1 | # Added by Yingchi |
现在在回到layout.ejs把之前的三行改成下面这样的:
1 | <% if (is_home() && theme.home_sidebar) { %> |
is_post(),is_home()是hexo自带的函数
Wait, 以为现在就万事大吉了么,事情并没有这么简单。。你会发现文章的宽度并不会自动调整。打开JavaScript Console会发现文章所在元素是<section id="main">,我们现在就去主题的文件里找对它的设置。
找到文件~/hexo_blog/themes/icarus/source/css/style.styl
1 | #main |
改成下面这样:
1 | #main |
@media xxx,side_baretc 都是在别处(_variables.styl)定义好的CSS规则和变量
接下来打开 ~/hexo_blog/themes/icarus/source/css/_variables.styl
在//Sidebar这个部分加入我们在上面用到的变量:
1 | // Sidebar |
更多
如果还想自定义CSS的话,主题样式文件都在themes/icarus/source/css/_partial里,对照着页面文件找到对应的class样式去修改吧。
比如我这里发现在打开文章的时候,显示的效果并不是很理想。
时候可以在测试页面按cmd+opt+j调出Javascript console查看元素。会发现它是从根目录下public/css/style.css而来,但是我们直接改这里的话是没有用的。因为所有public文件夹下都是由hexo g生成的。
所以这里可以更改我们所用主题的css生成文件。例如我的在这个路径下~/hexo_blog/themes/icarus/source/css
桑心的是,我试图修改了_variables.styl里面的sidebar-column之类,然后运行
1 | $ hexo clean |
发现并没有什么*用。。。
过了几天意识到作为没有基础的小白,思路已经错了。我想要做到的是在文章页面只显示文章,并且居中,而不现实profile和sidebar。在主CSS文件里面改的话,它并不能辨别这个页面是否是文章页面,改动@media下面的内容会对所有页面的#main元素造成影响。
所以去查看了关于Hexo主题开发的一些教程,发现对于不同类型页面一般是由主题下的layout文件夹里的*.layout文件控制。
查了简单的ejs语法资料,修改成下面的样子
1 | <div id="container"> |
注意:代码内两种改变css的方法都可用,放在这里只是给自己做个记录
然后就好啦~
其他有趣的extension
添加 live2d 看板娘
什么是看板呢?她长这样👇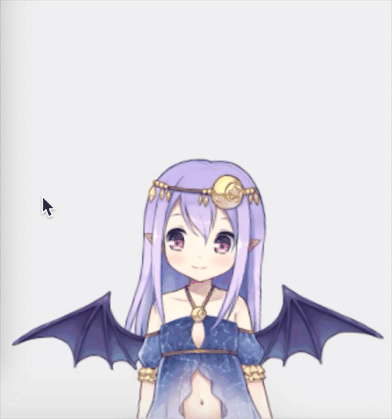
- 下载张书樵大神的魔改项目 git clone https://github.com/stevenjoezhang/live2d-widget.git,解压至博客的主题目录下。以我用的icarus为例:`themes/icarus/source`
修改
live2d-widget项目中的autoload.js文件的const live2d_path为1
const live2d_path = "/live2d-widget/";
在控制主题layout的文件里,
themes/icarus/layout/layout.ejs加入<script src="/live2d-widget/autoload.js"></script>。注意不同的主题可能使用不用的文件控制layoutthemes./icarus/_config.yaml中新增以下:1
2live2d:
enable: true
想修改看板娘大小、位置、格式、文本内容等,可查看并修改 live2d-widget folder下的waifu-tips.js 、 waifu-tips.json 和 waifu.css